Quick Start Guide
Before you begin using TopBid, it's essential to set up your business information and default values. These settings form the foundation for all estimates, invoices, and purchase orders generated by the app.
First-Time Setup
When you first launch TopBid, you'll be prompted to complete the following settings:
- Business Information
- Your business name, address, and contact details
- These appear on all estimates, invoices, and purchase orders
- Financial Settings
- Default labor rate for countertop installation
- Material markup percentage for pricing
- Starting estimate and invoice numbers
- Material Costs
- Default costs per square foot for:
- Granite
- Marble
- Quartz
- Quartzite
- These costs are used when no price list is imported
- Edge Detail Costs
- Standard edge cost
- Upgraded edge cost
- Custom edge cost
- Terms and Conditions
- Default text for estimates and invoices
- Payment terms and conditions
Setting Up Price Lists
To use the most accurate pricing in your estimates, download and organize your supplier price lists:
- Download Price Lists
- Visit the Downloads page on our website
- Download the price lists for your preferred suppliers
- Need a different supplier? If you don't see a price list for your preferred supplier, contact us at topbid@utahgran.com with the supplier's contact information. We'll work with them to create a compatible CSV file for the app. We'll contact you when the new price list is available or if the supplier chooses not to make their price list available in the app.
- Create a CSV Files Folder in iCloud
- Open the Files app on your iPhone
- Tap "Browse" at the bottom of the screen
- Select "iCloud Drive"
- Tap the "..." (more) button in the top-right corner
- Select "New Folder"
- Name the folder "CSV Files"
- Tap "Done"
- Move Price Lists to the CSV Files Folder
- In the Files app, locate your downloaded price lists
- Long press on each ZIP file
- Select "Move" from the menu
- Navigate to the "CSV Files" folder you created
- Tap "Move" to place the file in the folder
- Repeat for each price list
Why These Settings Matter
- Accuracy: Default values ensure consistent pricing across all jobs
- Efficiency: Pre-filled information saves time when creating estimates
- Professionalism: Complete business details on all documents
- Flexibility: Settings can be updated anytime to reflect changes
Next Steps
After completing the initial setup, you can:
- Create your first job
- Import material catalogs from suppliers
- Start generating estimates
- Create purchase orders
- Track payments
Remember: You can always update these settings later in the Settings View.
1. Getting Started
TopBid is crafted for countertop fabrication businesses to streamline job management, from
quoting to invoicing. Upon launching the app, you'll enter the Jobs View, your central hub for
overseeing countertop fabrication projects.
1.1 Key Features
- Manage homeowner and contractor-based countertop jobs
- Add and edit rooms and countertops within jobs
- Generate estimates, invoices, and track open invoices
- Record payments and manage subscriptions
- Manage suppliers and materials inventory
- Create and track purchase orders
- Synchronize data across devices with iCloud
- Customize fabrication settings, material costs, and business terms
1.2 Navigation
- Use the toolbar at the top for settings, user guide, open invoices, and payment options
- Tap items to select them, and use context menus (long press) or swipe actions for editing
and deletion
- Buttons with a 3D effect (e.g., "New Homeowner Job") initiate key actions
1.3 Subscription Model
- Free Tier: Limited to 5 estimates with basic features
- Pro Tier: $19.99/month or $199/year for unlimited jobs, invoicing, PDF exports, and full customization
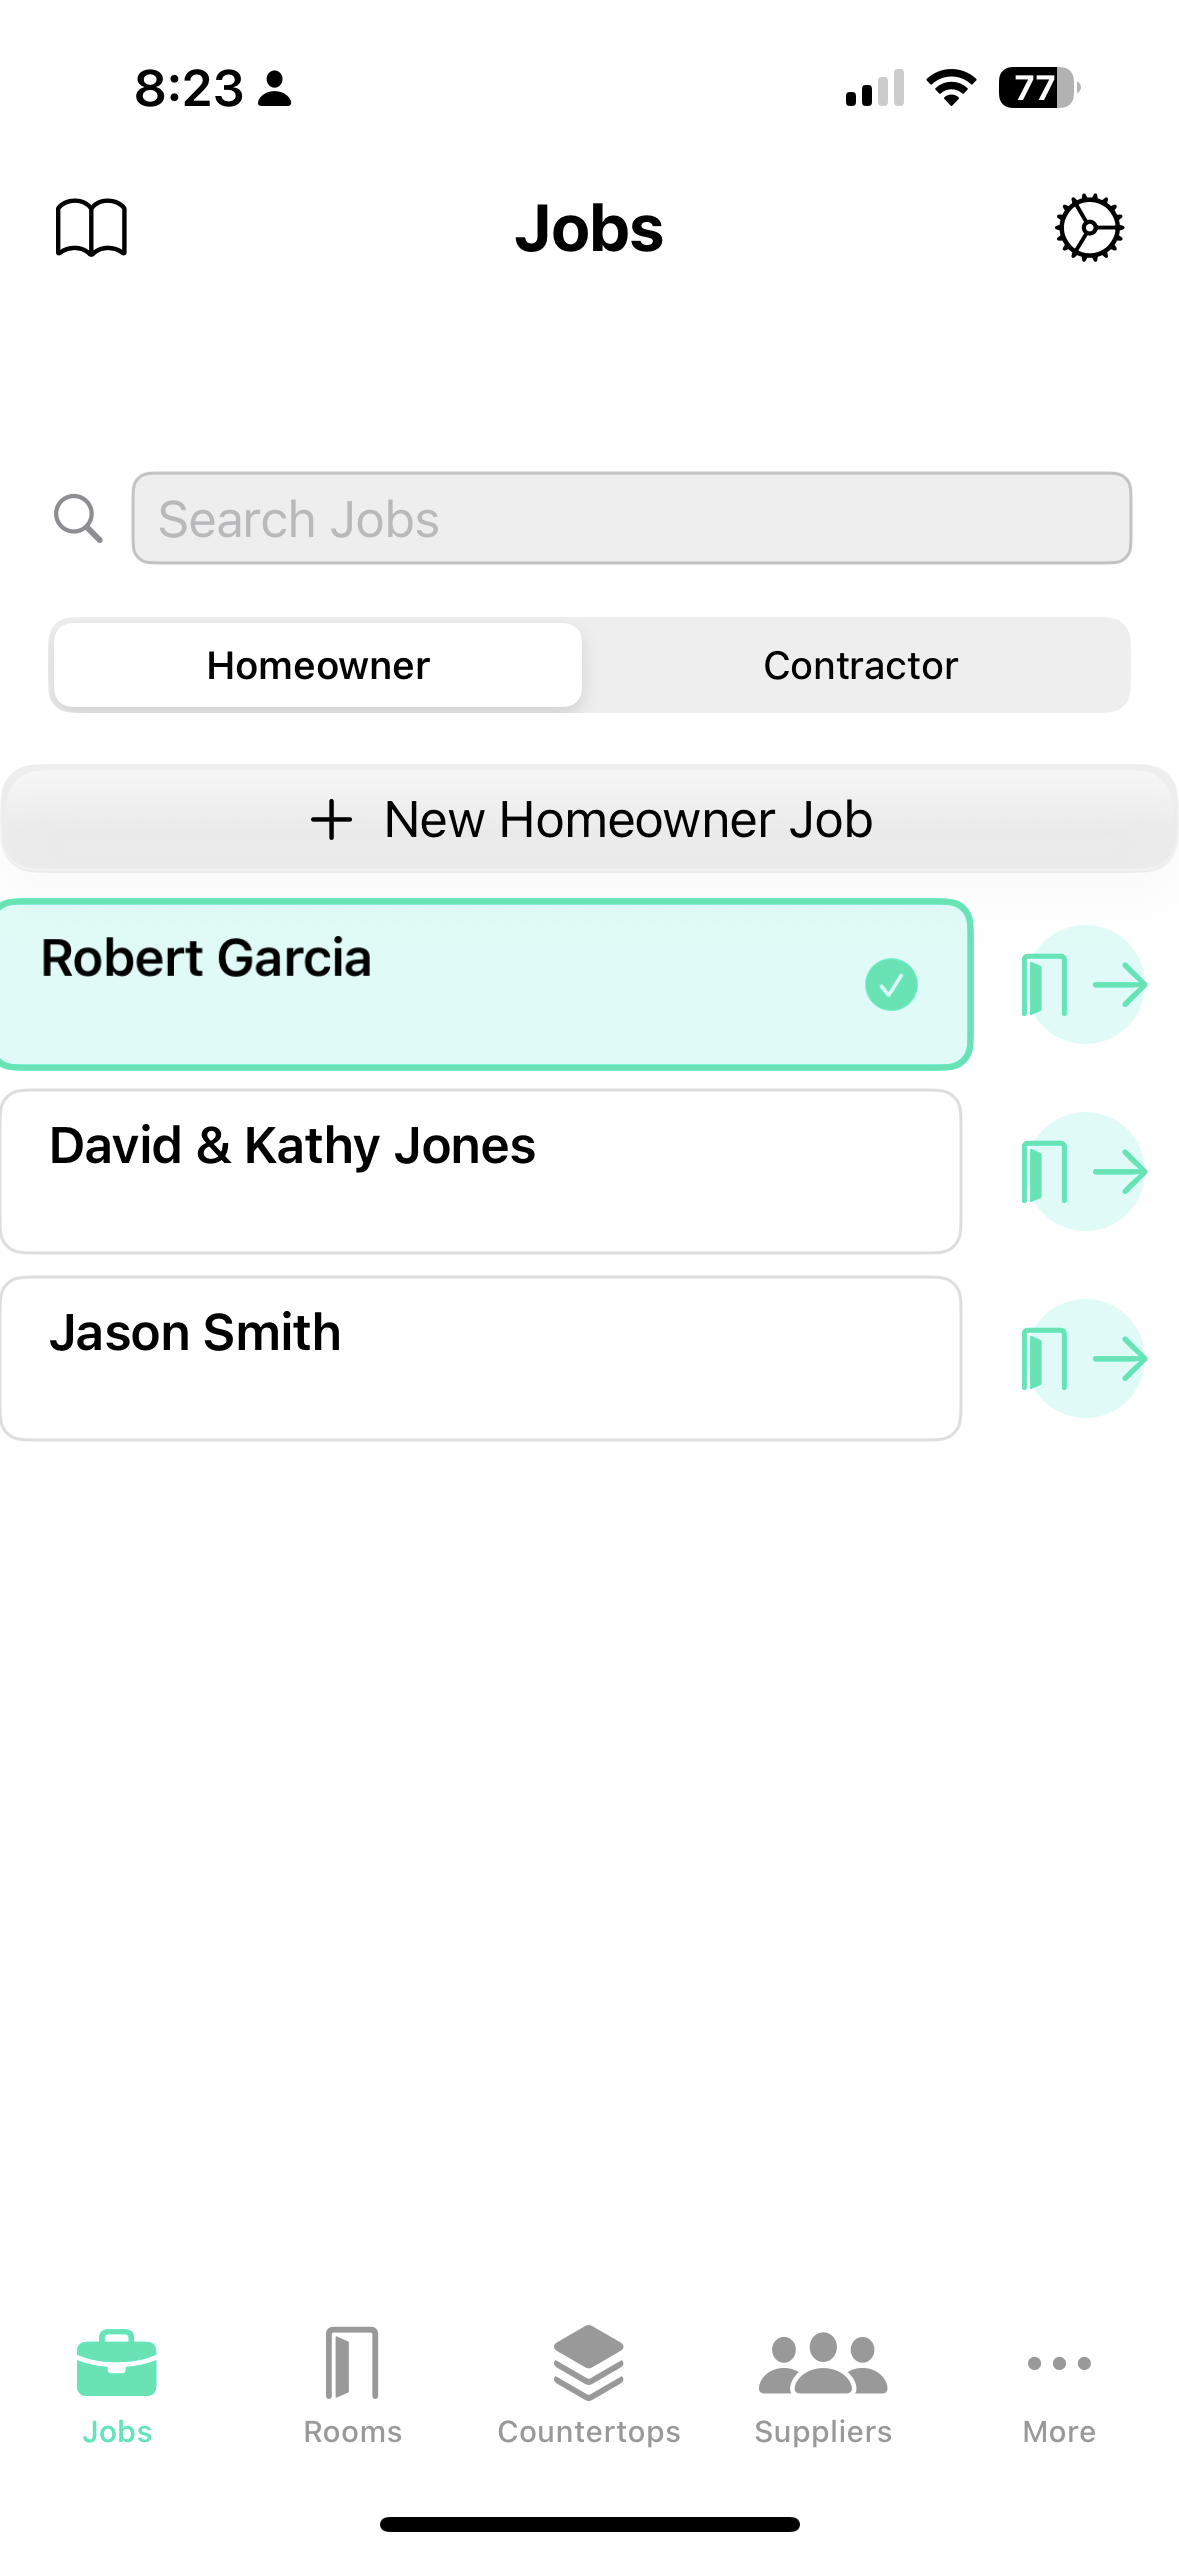
2. Jobs View
The Jobs View is where you manage all countertop fabrication projects, categorized as either
Homeowner (standalone) or Contractor jobs.
2.1 Overview
- Search Bar: Filter jobs by name or contractor
- Job Type Picker: Switch between Homeowner and Contractor views
- Job List: Displays jobs sorted by last modified date (newest first)
2.2 Homeowner Jobs
- Lists countertop jobs not tied to contractors
- Add Homeowner Job: Tap the "New Homeowner Job" button to create a new standalone job
2.3 Contractor Jobs
- Lists contractors and their associated countertop jobs
- Add Contractor: Tap "New Contractor" to add a contractor
- View Contractor Jobs: Tap a contractor to see their jobs, then tap "Add Job" to create a new
job for them
- Back to Contractors: Return to the contractor list from a specific contractor's jobs
2.4 Actions
- Select a Job: Tap a job to highlight it and make it the current job
- Rooms: Tap the door icon next to a job to view its rooms
- Edit: Long press a job or contractor, then select "Edit" from the context menu
- Delete: Long press and select "Delete" (confirms with a dialog)
2.5 Toolbar
- User Guide (Book Icon): Opens this guide
- Settings (Gear Icon): Opens the Settings View
2.6 Demo Limitations
- The demo version is limited to 5 estimates
- When this limit is reached, you'll see an upgrade prompt to unlock unlimited estimates with the Pro subscription
3. Rooms View
The Rooms View manages rooms within a selected countertop fabrication job.
3.1 Overview
- Displays the job name at the top
- Lists all rooms in the job, each representing an area for countertop installation
3.2 Adding a Room
- Tap "Add Room" to open the Room Form and define a new countertop area
3.3 Managing Rooms
- Select a Room: Tap a room to highlight it
- Edit: Long press a room and select "Edit" (or swipe right on iOS)
- Delete: Long press and select "Delete" (or swipe left on iOS), confirming via a dialog that
also deletes associated countertops
3.4 Room Information
- Each room displays its name, material type, and related information
- The material can be imported from a catalog or selected from a list
3.5 If No Job is Selected
- Displays "No Job Selected" with an exclamation icon
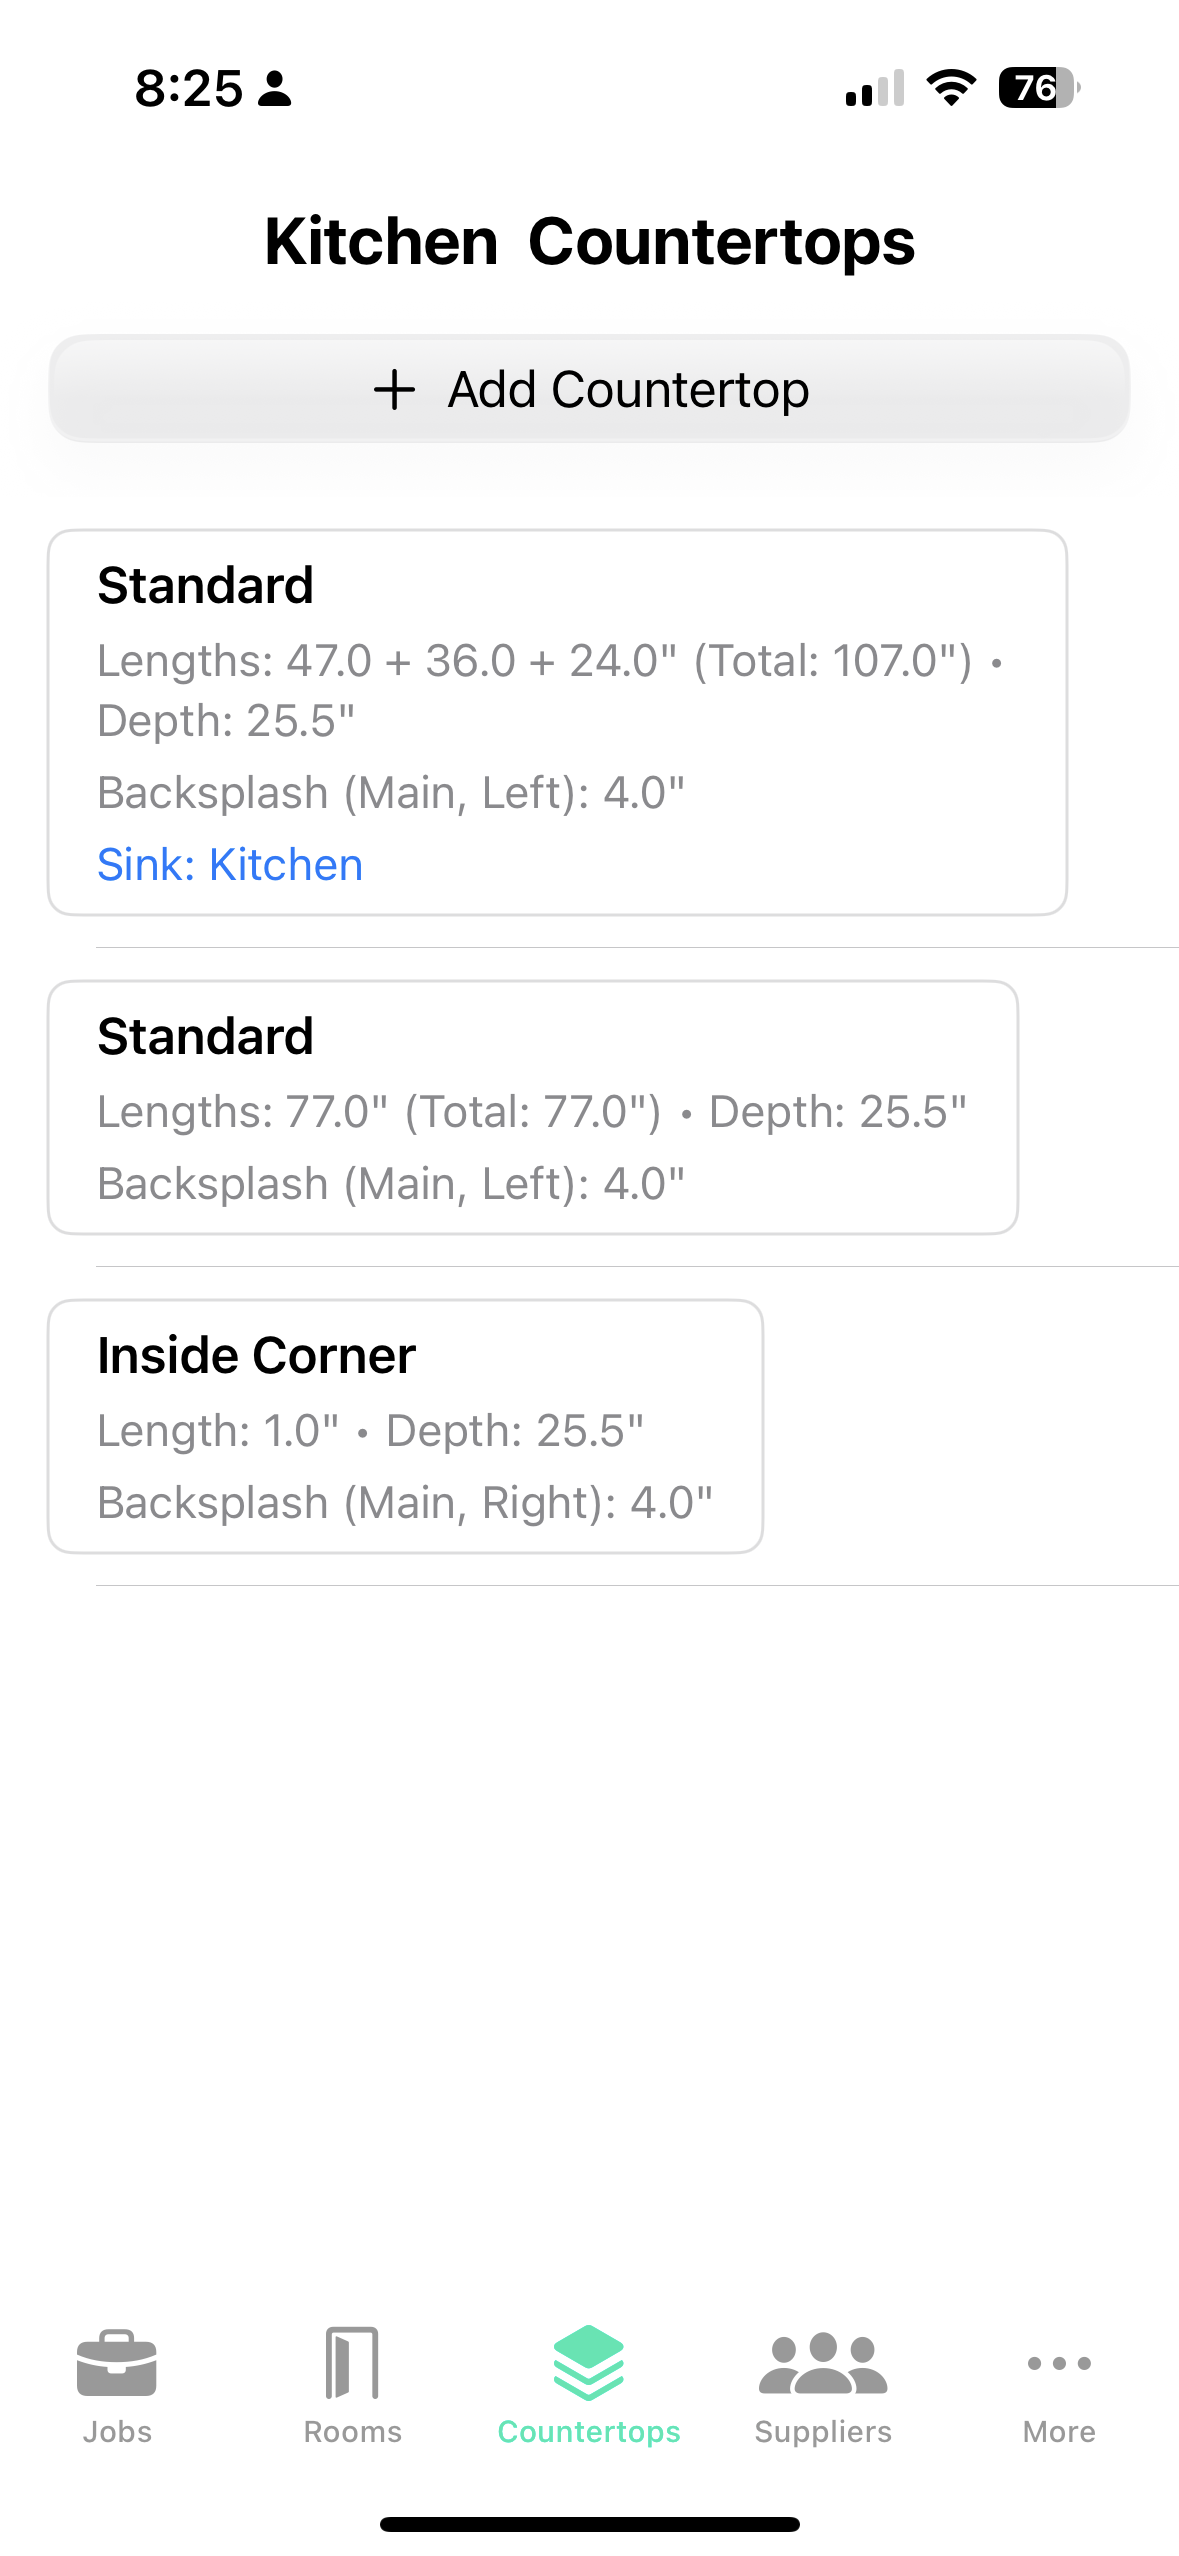
4. Countertops View
The Countertops View manages countertops within a selected room.
4.1 Overview
- Shows the room name followed by "Countertops"
- Lists all countertops planned or fabricated for the room
4.2 Adding a Countertop
- Tap "Add Countertop" to open the Countertop Form and specify details
4.3 Managing Countertops
- Select a Countertop: Tap a countertop to immediately open its edit form
- Edit: Long press and select "Edit" (or swipe right on iOS)
- Delete: Long press and select "Delete" (or swipe left on iOS), confirming via a dialog
4.4 Countertop Types
- Standard: Regular straight countertops, can have multiple sections
- Standard Vanity: Bathroom vanity tops with specific dimensions
- Waterfall End: Countertops with vertical sections that flow down the sides
- Angled Corner: Corner pieces (Lazy Susans or corner sinks) with specific angle requirements
- Inside/Outside Corner: Special corner configurations
4.5 Special Features
- Backsplash Options: Configure main, left, and right backsplashes with heights
- Sink Configuration: Add sink details with model, cost, and labor information
4.6 If No Room or Job is Selected
- Displays "No Room Selected" or "No Job Selected" with appropriate icons
5. Summary View
The Summary View provides a detailed cost breakdown for a countertop fabrication job.
5.1 Overview
- Shows job details, room summaries, and a total cost card
- Indicates whether it's an Estimate or Invoice
5.2 Components
- Job Summary Card: Name, address, phone, email, notes, and status (Estimate/Invoice)
- Room Summary Cards: Material type, countertop details, square footage, and itemized costs (material, labor, sink, total)
- Total Summary Card: Detailed breakdown of material, labor, sink costs, subtotal, tax, discount, and total cost. For invoices, shows payment status (PAID/UNPAID)
5.3 Actions
- Generate PDF: Tap "Generate Estimate" to create and share a PDF of the summary (requires Pro subscription)
- Convert: Tap "Convert to Invoice" to open the Invoice Edit View for invoice generation (requires Pro), or "Convert to Estimate" to revert an invoice to an estimate
5.4 Pro Features
- PDF generation for invoices requires a Pro subscription
- Free users will see an upgrade prompt when attempting to generate PDFs or convert to invoices
5.5 If No Job is Selected
- Displays "No Job Selected"
6. Supplier View
The Supplier View allows you to manage material suppliers for your countertop business.
6.1 Overview
- Lists all your material suppliers with contact information
- Search functionality helps you quickly find specific suppliers
- When a supplier is selected, their purchase orders are displayed below
- "New Supplier" button creates a new supplier entry
- "New Purchase Order" button (enabled when a supplier is selected) creates a new order
6.2 Managing Suppliers
- Select a Supplier: Tap to view their details and purchase history
- Context Menu: Long press to access Edit, New Purchase Order, and Delete options
- Add Supplier: Tap "New Supplier" to open the Supplier Form and enter contact details
6.3 Room Integration
- Suppliers can be selected when creating/editing rooms
- Selected supplier's materials are available in the room form
- Purchase orders can be generated directly from room materials
- Supplier selection helps track material sources and streamline ordering
6.4 Purchase Orders
- View a list of purchase orders for the selected supplier
- Tap a purchase order to view/share its PDF
- Create new purchase orders with the "New Purchase Order" button
- Track materials ordered from each supplier
6.5 PDF Generation
- Purchase order PDFs are automatically generated and can be shared
- PDFs include business details, supplier information, and ordered materials
7. Invoice Edit View
The Invoice Edit View provides tools for creating and customizing invoices for your clients.
7.1 Overview
- Configure invoice details including deposit requirements, due dates, and amounts
- View payment summary information
- Generate professional invoice PDFs
7.2 Invoice Options
- Use Percentage: Toggle between percentage-based or fixed-amount deposits
- Deposit Percentage/Amount: Set how much the client should pay upfront
- Invoice Amount: Set the total invoice amount
- Due Date: Specify when payment is due
- Invoice Type: Choose between Deposit or Final invoice types
7.3 Payment Summary
- View total invoice amount and calculated deposit
- See payment history including dates and amounts
- Track balance due and payment status
7.4 Actions
- Save and Create Invoice: Generate an invoice PDF based on entered information
- Open Invoices: Access the Open Invoices View from the toolbar
7.5 Pro Features
- Invoice creation and PDF generation requires a Pro subscription
8. Open Invoices View
The Open Invoices View tracks all unpaid invoices across your jobs.
8.1 Overview
- Lists all jobs with unpaid invoices, showing job name, amount, and due date
- Overdue invoices have their due dates highlighted in red
- Search functionality helps you find specific invoices
- Accessible via the toolbar in Jobs View
8.2 Actions
- Select an Invoice: Tap to open the Payment Entry View
- Context Menu: Long press to access Edit Invoice, Record Payment, and Send Reminder options
- Edit Invoice: Modify invoice details or due dates
- Record Payment: Open Payment Entry View to record a client payment
- Send Reminder: Generate and share a reminder PDF for the client
8.3 If No Open Invoices
- Displays "No Open Invoices" if all invoices are paid or none exist
9. Payment View
The Payment View manages payment recording for invoices.
9.1 Overview
- Record payments received from clients
- Track payment history and running balances
- Generate payment receipts and updated invoices
9.2 Payment Details
- Payment Received: Enter the amount received from the client
- Payment Summary: View total invoice amount, deposit information, payment history, and balance due
9.3 Actions
- Save: Record the payment without generating a PDF
- Save and Create Invoice: Record the payment and generate a receipt or updated invoice PDF
- When a payment completes the full invoice amount, the job is automatically marked as "Paid"
9.4 PDF Generation
- Generate "Paid in Full" receipts when the full amount is received
- Create partial payment receipts for ongoing payment plans
10. Purchase Order View
The Purchase Order View helps you create and manage material orders from your suppliers.
10.1 Overview
- Create purchase orders for materials needed for your jobs
- Optionally link orders to specific jobs for tracking
- Generate professional PDFs to send to suppliers
10.2 Creating Purchase Orders
- PO Number: Assign a unique purchase order number (auto-filled from job name if linked)
- Job Selection: Optionally link the order to a specific job
- Materials: Add materials with descriptions and quantities
- Materials can be added, edited, or deleted using the interface or context menu
10.3 PDF Generation and Sharing
- Purchase orders are automatically generated as PDFs
- PDFs include business details, supplier information, and ordered materials
- PDFs can be shared via email or other sharing options
- On iOS, use the share sheet to send PDFs
- On macOS, use the share button or drag the PDF to your preferred app
10.4 Actions
- Save: Create the purchase order, link it to the supplier and job, and generate a PDF
- Cancel: Discard the purchase order draft
11. Settings View
The Settings View customizes preferences for your countertop fabrication business.
11.1 Overview
- Organized into sections: Business Info, Financial Settings, Material Costs, Edge Costs, Terms, and Import/Export
11.2 Business Information
- Set your business name, address, and contact details
- Configure default terms and conditions
- Set up your business logo and branding
11.3 Financial Settings
- Configure default labor rates
- Set material markup percentages
- Define tax rates and calculations
- Set up payment terms and conditions
11.4 Material and Edge Costs
- Set default costs for different material types
- Configure edge detail pricing
- Import material catalogs from suppliers
11.5 Data Management
- Import/export business data
- Backup and restore settings
- Sync data across devices
Need the complete guide?
Download the full TopBid User Guide PDF for offline reference.
Download Full Guide